Wednesday, April 30, 2014

Decorate To Celebrate Challenge Mom's Day....Mosaic Frame

MY STORY

     One of the most exciting and terrifying parts of being a Mom is watching your children grow up.  It seems like only yesterday my son was starting kindergarten and now he is a Lance Corporal with the US Marine Corps stationed overseas.

     On one of my "I better clean up this house" days, I found the boots he wore during his 3 months at Boot Camp as well as little tiny boots he wore as a baby.  Boots....Boot Camp....photo op!  I took this photo as I think  it is a very graphic reminder of how time has flown by.


     I wanted to create a special frame for this so here are my steps in making a mosaic frame for, OK I admit it, myself as well as all the Grandmas, Aunts, Sisters....all the wonderful women in my life that have helped and guided me in this journey.

YOUR TURN

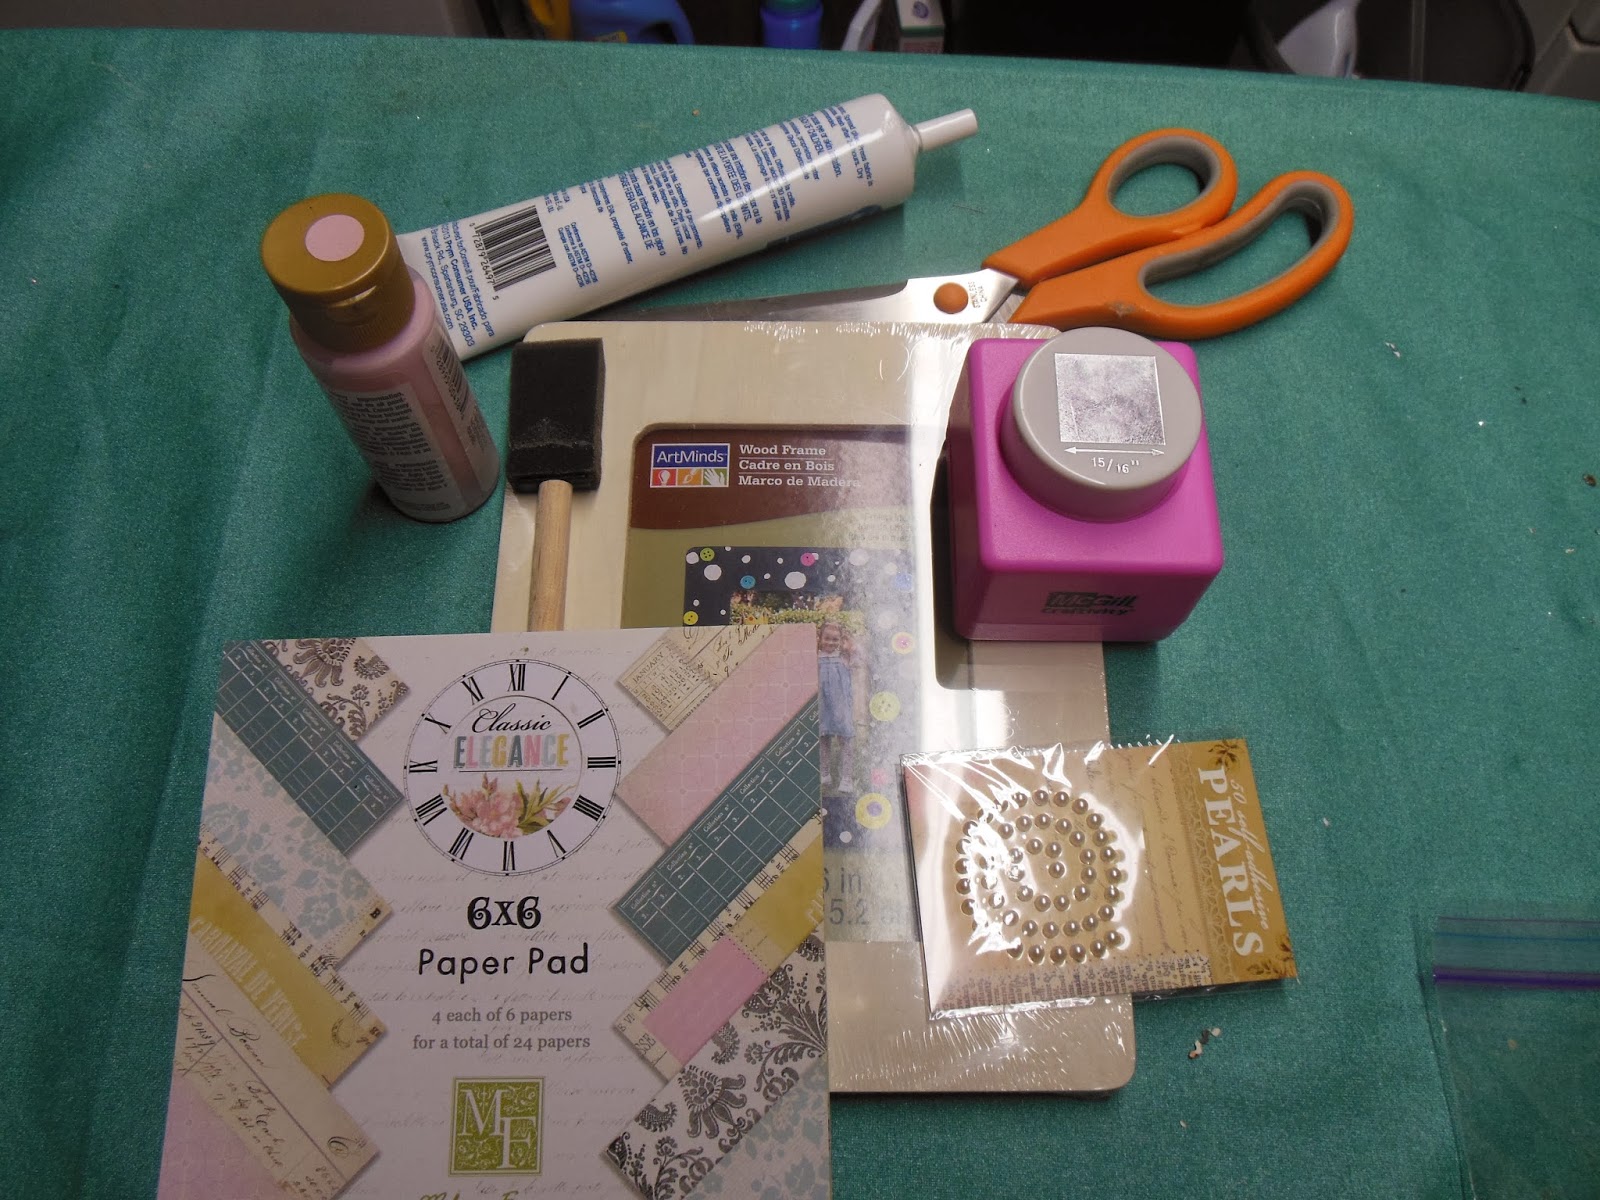
     Here is what you need to get started.  HINT:  The paper packs in the craft stores take a lot of the guesswork out of coordinating your papers.  I was going for a shabby chic look for my frame.


     1.  Paint your frame in a color that is complementary with your papers.  I only used one coat but you can add as many as you want to get the depth of color you desire.  HINT:  Don't forget to paint the sides and inside the photo part of your frame.  I keep the paper insert in place so I can be sloppy with my paint  on the inside of the frame.


     2.  Using the decorative punch, start punching out your papers.  NOTE:  I tend to like odd numbers of papers as opposed to even.  No particular reason why I just think it adds more interest.  HINT:  Don't throw  away the paper once you have punched it out.  The papers with the squares cut out can be used for future projects.


Paper left over for another crafty idea!

    3.  Decide on the pattern of colors and stick with it.  I went blue,pink, black and maintained that throughout the frame.  HINT:  To start off evenly, I placed the straight edge of the paper to use as a ruler.

    4.  Continue gluing your squares down.  Let the edges go past the edge of the frame.   It shows more interest when completed.  But don't cut them off yet.

Notice the squares are coming off the sides and bottom

    5.  Optional step:  Cover your frame with a couple  of coats of Mod Podge.  You don't have to, but it is a further sealant to keep your papers on the frame and adds some sheen to your finished piece.  For this example, I used the Antique Matte finish in keeping with my shabby chic idea.  But it comes in so many finishes, it is totally up to you.  HINT:  When you apply it, you will think "oh no, I have ruined it".  Not to worry, they all dry clear.


   6.  When the Mod Podge has dried trim off the edges.  Add pearl stickers or any other embellishments.  The mosaic looks great whether you choose to use the frame in a  horizontal or vertical format.


     This concept is so fun and easy to do, you will get hooked.  And think of all the beautiful papers out there -- holiday, baby, sophisticated.  You can create so many looks just by changing up the color of your paint and papers.

Enjoy and happy Mother's Day to all the beautiful women out there.  As they say, it takes a village to raise a child.


Monday, April 28, 2014

I'm With The Band ! Call for Artwork

I am helping out some friends -- the Peter Monroy Band in Las Vegas are just about to produce their 2nd EP of original music.  They are looking for some original artwork - sketches; drawings; photos - and will choose their favorite!  The artwork selected will be produced as their cover art, publicized on their website, used in promos, etc.  And what fun to say you are "with the band".

For inspiration, check out some more info on their blog @ www.petermonroybandblog.blogspot.com.
There is also a link on their blog where you can check out their website and check them out on YouTube.

All entries will be reviewed anonymously by all members of the band.... and fun things will be yours!

Friday, April 18, 2014

Heavy Metal in The Studio

Ok, so not the Dokken or Cinderella kind of heavy metal, but I am so in love and obsessed with my new ORIGINAL PINK BOX storage cabinet by Viper.  So I had to share my obsession.

First of all, it is pink.  What is not to love about that???  And they have these cabinets in turquoise, black, purple, yellow, green....like metal candy !!!!

For a fair cost, this is one very well made storage cabinet.  There are several different sizes and options, this size fits perfectly under my studio desk (and if you notice there is some room to the left where I could place another one yipee).  This unit also comes with matching drawer liners which keeps everything in its place and just so darn cute.

There's my beauty...now I want to change out my flooring and rugs!

Here is my new baby...and I am one proud Momma:
Drawer two...buttons and beads

I have enough ink to open a store I think!

My treasured vintage pendants;yarns;threads and inkers
WASHI TAPE FOR DAYS. And my postcards and acrylic blocks for stamps made by my awesome better half
cardstock, cardstock, cardstock.......


Check out Viper Tool Storage for a  list of all their goodies.....also available at Sears, Walmart and Amazon.com.

These well made units are a big hit in salons and for makeup artists in addition to crafters and shop folks.  In researching this product, I came across this YouTube video for a young woman known for her make up reviews and her room is something out of  this world!   LOVE HER!


Wednesday, April 16, 2014

Decorate To Celebrate Design Team Challenge - "Not Your Kid's Easter Basket!"

MY STORY

     In addition to being with family, nothing says Easter to me as much as yellow Peeps, jellybeans and solid chocolate bunnies.

     However, many of my friends are trying to shy away from the sweets whether for medical reasons or no appropriate points plus value on the Weight Watchers plan! :)

     I have come up with an alternative to the "sweet" Easter basket, although I do think this is still very sweet but kinder to your teeth and waistline.

     This basket was made for my friend who loves gardening and birds.

YOUR TURN

     When you start shopping for supplies, (I know me too I already have tons) I find it easier to have a theme or a color palette in mind.  For this basket, I concentrated on garden/birds and mostly the blue/green/cream family.  I gathered up what I thought looked good together and a bonus is that they were all on sale!  Oh happy day.


     Before you start gluing anything down, play around with your elements.  Similar to flower arranging, you want to create different heights, figure out your focal pieces, make sure it looks good from every angle, etc.  I added different size styrofoam at the bottom of the basket to create different planes.  


     Start adding your tallest elements....these old fashioned eggs come on wire sticks so some of them I cut so they were not all the same height (in addition to having different sizes of styrofoam).


    To keep with my bird/gardening theme, I loved these unfinished wood plant stakes.  Using spray ink, cover your plant stake.  Let dry between coats for a deeper color.  Also spray ink your little cut out bird (more  on him later).

     I also found pretty stickers and loved that the theme and the color were in line with my basket.  Adhere the sticker to your plant stake once it is dry.


     Once you have added all your elements use plastic grass and fill in all your holes.  I love the grass I found at Michaels...it was not as "plastic" as the drugstore type and came in a pretty cream color.


   I always get a little craft high when I find a product I had never heard of and can use in my project.  Waverly makes these soap petals.  So not only do they add a nice finishing touch around the basket, but they smell beautifully and my gardening friend can peel off a petal and wash her hands after a long day digging in the soil.


     Now back to our little bird friend.....adhere him to the front of your basket.


     And you are done!  These ideas can be used with any theme or for any occasion.  Think about Christmas for the holidays or soups and hot chocolate for the fall.  And when you hit the sales at the right time, you can create a custom gift to give (or keep for yourself!!) for not a lot of money.


"All I really need is love, but a little chocolate now and then doesn't hurt!"  Lucy Van Pelt, "Peanuts"

Sunday, April 6, 2014

The Lazy's Girls Guide for Trash to Treasure

MY STORY

     As my husband was cleaning out his work space, he started to bring an old bookcase up to put out into the trash.  I immediately claimed it as a necessary item to help me organize some craft supplies.  I thought this was a perfect piece to place my stash for my current assignments and projects and it was the perfect working height.

     But it was ugly.  And I don't like ugly things.

     On a recent trip to one of my fav stores, Anthropologie, I feel in love with these cotton tea towels with elephants in my new go to colors of grey and yellow.

    So, a trip to my dollar store and $15 later, I had everything I needed to fix this up.  And I just wanted something now....wasn't even patient enough for paint to dry.  Here is how I did it and what I used:

YOUR TURN

    This is how the piece started:


    Anytime I get to use power equipment is exciting.  Power sand the surfaces and wipe clean with a cloth to remove any residue.


    Then get started with some contact paper.   The same stuff that I used to decorate the inside of my school locker with.  I loved this faux marble look.  Measure and cut and cover the back and sides.


    I used some stainless steel paper for the front of the bottom shelf and for the top shelf.  I didn't really take time to anything else for the inside as the next steps will take care of that.


   And now for my beautiful Anthropologie towels.  Get sticky back Velcro and apply to the lip of the top bar and the front of the shelf.  Then adhere the opposite part of the Velcro to the top of the towels and voila!  Curtains. Repeat for each towel you are using.


  For the top I wanted to mix the stainless steel contact paper with the marble.  I like the different backgrounds for photographing projects.  Some items look better on the shiny surface, while others work much better on a busier background.  I also liked the metallic placement I found and it works great for keeping runaway beads in their place.

   With some items from The Container Store and Michaels, I was able to group my active projects and they are easy to get to and use.


   Contact paper is a great surface.  It wipes off with a wet cloth and the curtains are machine washable.  And the best part?  If I decide I need a purple and polka dotted piece next season, I just rip off the paper and do again!


   Have fun!