Wednesday, August 20, 2014

Challenge Time at Decorate To Celebrate: Grandparents Day

MY STORY

    Earlier this summer, my friend asked for help in decorating for her Grandmother's 100th birthday party.  She really wanted to utilize some family photos and to keep it after the party was over for her Grandmother to enjoy.  I went through my stash and found an item I had wanted to use for  a while.  But it was a vintage Easter egg tree for a centerpiece from Oriental Trading Company.  So I put my thinking hat on and used the item in another way (which I love to do!!!)  And it was less than $5.00.  But now I need to think of something for next Easter.

YOUR TURN

    This is how the original product is supposed to be used.


    For my friend's project, I used:

  • One of the trees
  • The cardboard that came in the packaging
  • Some of the eggs
     Step One:  Find complementary papers to glue onto the cardboard as your base.  I liked the green of the tree so went with similar colors.  You probably won't have paper large enough to cover so I used 2 different papers and laid them out accordingly. Lay out however you like.  


     Step Two:  Adhere your tree to the center of the board. HINT:  I traced this tree out a couple of times.  I have one leftover from the original package, but loved this design so I wanted to insure I had the option to use in the future for any other projects.

    Step Three:  Choose photos from your computer or scan in old photos from family members.  In a photo editing program like Picasa, print the photos using the wallet size option onto glossy photo paper.  If you don't have a printer to do this, Staples can help you out too.

    Step Four:  Using the eggs as a template trace around your photos as desired.

    Step Five:   Glue onto the eggs.  HINT:  If you still need to trim some of the photo, glue into place then turn over.  It is much easier to see what you need to trim from the back.


    Step Six:   Place and glue as desired.  I ended up, in the final project, pretty much filling up the tree, but this example I used less so it is easier to see.  

   Step Seven:  I found a beautiful quote on Google about Family and Trees.  Save as a jpeg and then using Publisher or Picasa, change the color or layout as you wish.  Adhere to the board.


   Step Eight:  I had some fun rhinestone stickers left from another project.  I added these on the top of each egg and then up the trunk and around to add some sparkle and dimension.

     That's it! 

    This idea can be used in many different projects....I think my main goal is to help you look at products or things you have around and come up with different ways to use it.  This was a big hit with Grandma and now I have several others to make for other friends and events.  This is great for birthdays, baby showers, anniversaries, weddings, etc.


Wednesday, August 6, 2014

Decorate To Celebrate Design Team - Back To School For Teacher

MY STORY

      It has been a couple of years since I have had to think about back to school.  Although I miss my son, a US Marine Corps Lance Corporal, I do not miss waiting on line to buy that 2" maroon binder that every kid in the school district had to purchase.  I do remember, though, some of his teachers.  I always tried to give a little something to his teachers and I thought this was a cute project, and using repurposed items which I love!  Taking little cups meant for another purpose and with just some decorative tape and burlap scraps you can create little containers for the knick-knacks all teachers need.  They are pretty enough to sit on a desk, but short enough to fit in the top hand desk drawer.

YOUR TURN

     I found these little cups in my local party store -- their original intent is for melted butter to dip your lobster pieces in.  Well, since we are talking back to school, summer items are on a huge clearance (even though I do not believe summer ends until mid September :).  They came several in a package at a really good price.


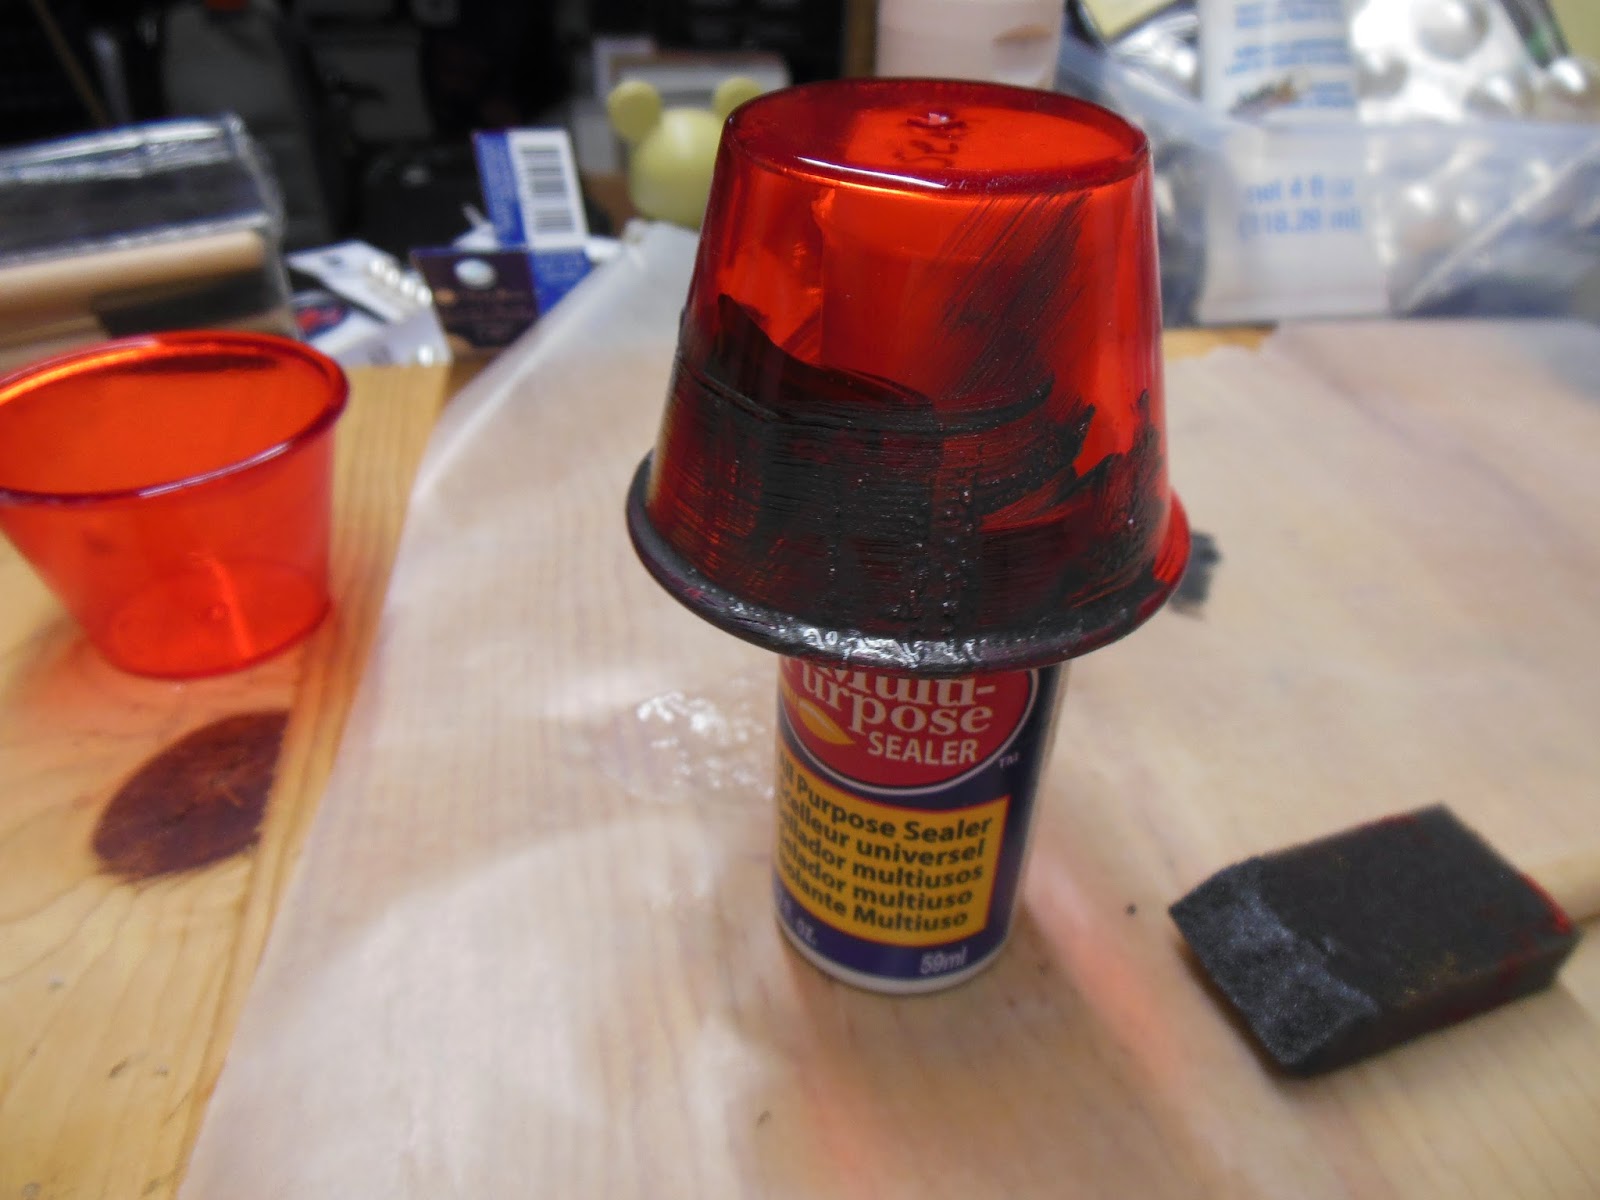
    First off, you want to paint the lip and top 1/4 of the cup (inside and out) with a paint sealer/primer.  Especially on plastic, you want your acrylic paint to adhere well.  Once dry, paint with a dark color paint in those same areas.  HINT:  Use a foam brush in a dabbing motion as opposed to spreading it like normal paint.  You will cover more surface with more paint and in less time.


A trick to paint something round and not get your hands dirty

    Once the paint is dry, start adhering your decorative tape as desired.  I did it both up and down and also around.  Up and down is easier.....but I like having a couple of different looks.  I was aiming for rustic/shabby which is how I chose the colors.


    Using burlap scraps, wrap or place as desired to add a little textural interest.


    I love these burlap napkin rings from Oriental Trading Company -- like there about $1 for three.  The napkin ring would not fit around the cup so I cut off the decorative part and applied.  I used the remaining scrap for a little coaster for the cups.


    That is it, an easy way to give a little something to your child's teacher or to use yourself to keep all those little bits organized.  Have fun crafting!


Sunday, August 3, 2014

Pump Up Your Paper

MY STORY

     I love all the magazines in the Stampington & Company family.  One of my favorites, Somerset Studio, always comes with free artist papers and I really liked this month's selection.  I decided to play around with the pages and some dimensional paint from Scribbles and I love how they came out.  My challenge to myself was to see how many projects/items I could get out of only two 8 1/2 x 11 pieces of paper.  I love the results.

YOUR TURN

     When you go to choose the papers you want to work with, find ones with a heavier weight --they seem to hold up to the techniques better.

     For the red sample that came in the magazine, I loved the hand painted quality to it and just started using my Scribbles dimensional paint to accent the artwork.  You don't want to completely obliterate the design, just enhance it.  No rhyme or reason, how much or how little, what kind of shapes is completely your choice.  HINT:  Before using the paint, hold the bottle upside down over scrap paper and shake down a couple of times.  Squeeze out some of the paint as practice.  These bottles have a tendency to "burp" so start a little on scrap paper before you go on to your piece.


    The concept is the same for the other floral paper.  Just have fun -- a little or a lot, the paint gives a fun boost to already pretty papers.  HINT:  This paint can be pretty thick, so don't rush the drying time otherwise you might end up with a smudgy mess.


     GREETING CARDS:  I like having a stash of ready-to-go blank cards for those unexpected parties, housewarmings or just to send to a friend moments.  (I used to keep a bunch at my office and you would be surprised how lucrative that became with all the work birthday parties and people forgetting to buy cards!)

     The first really easy way is to take your blank card stock, determine which part of the page you want as your card front, trace and it is just that easy.   That's it.   They work for so many different occasions.


     The next type of card are what I call the mosaics.  Here are a couple of totally different approaches.  TILES:   Using the green floral paper that you have left over.  Cut into long strips, then cut again across to create tiles.  I like the mismatched look, but if you want a more refined look, measure into exact pieces.


     I spread a thin line of glue all around the card surface as I don't have enough patience to glue every piece.  Begin laying out in whatever order you like.  The goal is not to recreate the original piece, although that would be a cool too.  OK to have some hanging over the edge and trim once dry.  Card # 3 done!


    A little bit more involved process but a fun technique is embossing.  Using a Versamark watermark pad, rub over the front of your card.  It is clear with a slight glisten to it.  Next, pour embossing powder over the whole card in a thick layer.  There are millions of colors and types of powders out there, I liked the color name for this one - Blackened Stoneware.  HINT:  Do the embossing powder application over a tray or some sort of plate.  Although you are using the whole jar, very little remains on your card front.  The rest is dumped back into the embossing jar.  I like the TIDY TRAY product.  Available on craft retailers and online and very affordable.


     Once applied, use a heat gun -- holding it straight up and down a few inches off your card and start melting the embossing powder into the Versamark treated card.  BE CAREFUL!!!  The heat gun gets really hot.  You will know when the embossing powder is melted correctly and it turns color and melts into a plastic like consistency.  See below for an example.


     Going back to the red paper, I cut in long strips but did not cut into tiles like the previous example.  Apply to your card front in whatever pattern you like - again I went for a more free form approach.  Done!


     The next card is what I call the scraps card.  Little bits of odd sizes...I cut them down with a decorative scissor.  Another way to make this card more unique looking...I trimmed off a strip from the front of the card, used that as a template and cut out a piece of the scrap and used that inside the card.  So when the card is opened, you have a strip of color on the inside of the card.  I also added some more scribble paint and I think it is another fun look.


     BOOKMARKS:  I believe there are still people out there that love books!   Even with my E-reader, there is nothing so satisfying as the feel and smell of a real book.  Takes very little scraps to create a fun bookmark.  Fun idea would be if you are giving a book to a friend, have the card and bookmark match.  Very cute!!

     GIFT TAGS/PLACE CARDS: With the small amount of paper you have left, save for place cards and/or gift tags.

Nothing is wasted on this type of project which I just love!   So with just two pieces of paper you have created some beautiful cards/gift items.  Have fun and experiment with different papers, colors, techniques.  It will get addictive I warn you!